
When Windows 10 October 2018 Update was released in October/November/December (Strike out those that don’t apply) of that year, it gained a reputation for being the most buggy version of Windows of the previous 20 years. Among one of the most bizarre issues that made it to the stable channel, and which somehow still hasn’t been fixed more than 3 months later, is how the font fallback for some types of legacy programs suddenly vanished. The result of that, was that alphabet fonts couldn’t fall back on characters from symbol fonts, or vice versa.
The existence of this problem broke through on the 24th of October 2018, with one Reddit thread and some articles in tech magazines, after which it has never been spoken of again. Until now.
In this guide, I’ll share the complex workaround I’ve found, that somewhat solves a problem that should never have existed in the first place in the products of any decent tech company.
Difficulty level: Quite high
Requirements: FontForge, as well as either one of Voidtools Everything or Windows 10 Default Fonts. You should also be prepared to do high-stakes registry editing, in most cases.
Completion time: Between 20 minutes and 2 hours (depending on which programs you want to fix the fonts of)
1) Which apps are you struggling with?
The programs that received the most complaints about missing symbol characters, were Foobar2000 and Counter-Strike: Global Offensive. However, the problem is a bit broader than merely those two programs. I had problems with missing symbols in Notepad, File Explorer (including in file names), and Character Map.
Different frustrating programs require dealing with different fonts. Filenames in Windows 10 uses Segoe UI, while many legacy programs uses Tahoma. Other programs, such as Command Line and Powershell, also use different default fonts that I haven’t looked into just yet.
Once you’ve identified the core programs, and figured out which fonts they use, move on to step 2.
2) Find the source fonts you’ll need to merge
The solution I am describing in this guide, is based around merging two (or more) fonts together to maximise the amount of characters they can show natively without fallback. As such, you’ll need to find the files of the two fonts that are to be merged.
The fonts you’ll need to find and copy over to a project folder of sorts, are:
- The alphabet font that is being used by the program that is missing important symbols.
- My strong personal recommendation for a symbol font, is that one of the fonts is Segoe UI Symbol, as it covers truckloads of symbols beyond merely ★ and ♪.
- If you want to be beyond completely covered, possibly even superfluously so, you could potentially add Segoe MDL2 Assets as well.
Now, you’d think they’d be stored in C:\Windows\Fonts, but it’s not that easy. The files that are there are very hard to copy, if not impossible for most people. However, taking a look at it with Voidtools Everything, a file search tool that is perhaps 100 times faster than Windows File Explorer’s search function (We’re talking 3 seconds compared to several minutes, and it can find hid-away system files as well), tells us that they’re stored in the WinSxS folders, which are pretty deep parts of the OS.
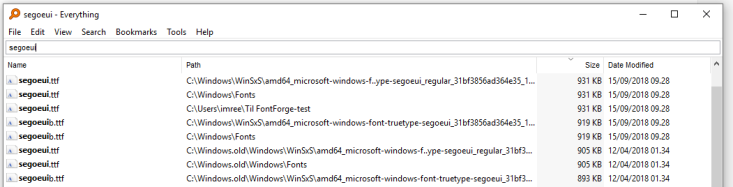
If you’ve already done such a search in Everything, you can simply right-click on those files and copy them to your folder of choice. PS: If there’s multiple files with the same (file)name, choose the one with the largest filesize.
Alternately, you can also check out Windows 10 Default Fonts, which offer all of Windows 10’s default fonts for download in one go, presumably for people who want to fix system font issues and the likes.
Now that you’ve copied the needed font files into a project folder, let’s move on to step 3.
3) It’s merging time!
If you haven’t already installed FontForge, now is the time to do so.
At the time this article was written, they require either a mailing list signup or a donation in order for you to reach their download link. They are however merciful enough to not require any validation of said E-mail, so you could very well just type completely random stuff into the E-mail box, as far as I can determine. Something like this should work well enough:
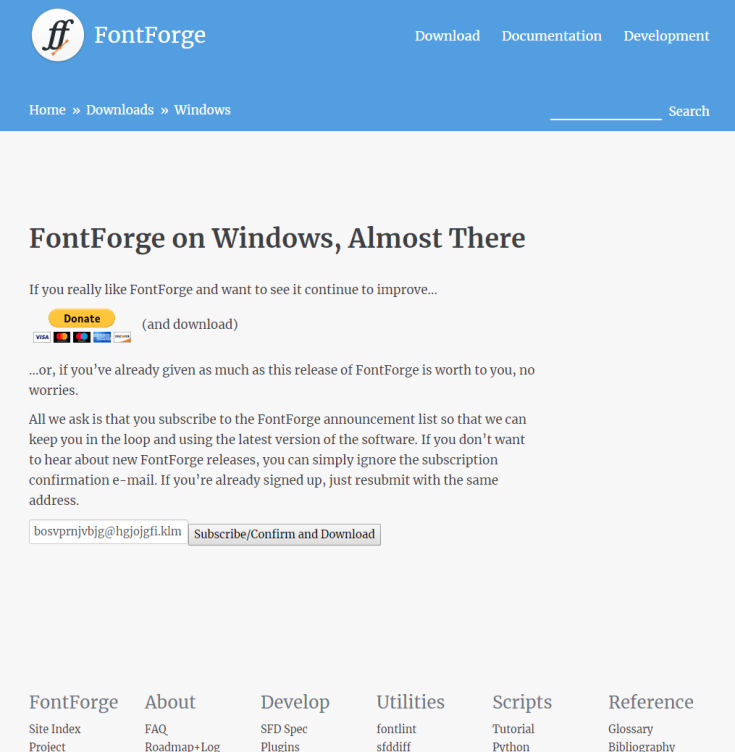
For the sake of gallantry, as well as respecting the human species, don’t try to write merely implausibly random things that could perfectly well turn out to be someone else’s E-mail address. For the record, I did use one of my own E-mail address for this after all, although it was not my main one.
So now that you’ve downloaded FontForge, let’s get down to business. For simplicity’s sake, the folder should look somewhat like this:

First, open the source alphabet font in FontForge. Do not open the symbol font first.
Now that you’ve done that, navigate your way to Element → Merge Fonts…, and choose the symbol font you’ve opted for.

If you’re in doubt on whether to retain kerning information, choose No.
Once you’re satisfied with the amount of characters that the font now covers, which you can see by scrolling down on the glyph list in FontForge, go to File → Generate Fonts…, take a look at the settings if you want to, and save the font.
Although you can easily tell an amended font apart from an original font by looking at its filesize (Amended is ca. 3MB, original is ≤1MB), you could also give it a handy little nick filename of your own, so that you can easily keep track of it.
4) Install the amended font
If this process went well, you can simply click on the resulting .ttf (or .otf) file and choose to install it.
If a prompt shows up that says that the font is already installed, and that asks if you want to overwrite it, choose Yes. If the prompt shows up, that means that you’ve lucked out and that this is the end point of this guide for you, as you can now simply restart your PC, open up Notepad, choose the font you’ve edited, and see that ★ and ♪ are now visible again.
If you did install the amended font, but did not receive an overwrite prompt, that means that you’ll need to buckle up and prepare for a dive into the Registry Editor.
5, if needed) Make the registry editor point to your amended font instead of the original one
While it’s thankfully not a labyrinth to get through, you should keep a steady hand on your keys when writing, and you must not make any writing mistakes when spelling out the needed filenames. You have been warned.
Do a search for regedit.exe on your PC, and run it. From there, presuming that you’re on a 64-bit PC (as what probably everyone should be today, unless they run Linux experiments on 00’s media centre PCs), paste the following text into the search bar on the top: HKEY_LOCAL_MACHINE\SOFTWARE\WOW6432Node\Microsoft\Windows NT\CurrentVersion\Fonts.
There you’ll find a long list with three columns: Name shows the font settings, Type is the kind of registry key the setting is using, and Data is the filename that the font is connected to. (The screencap below is in Norwegian.)
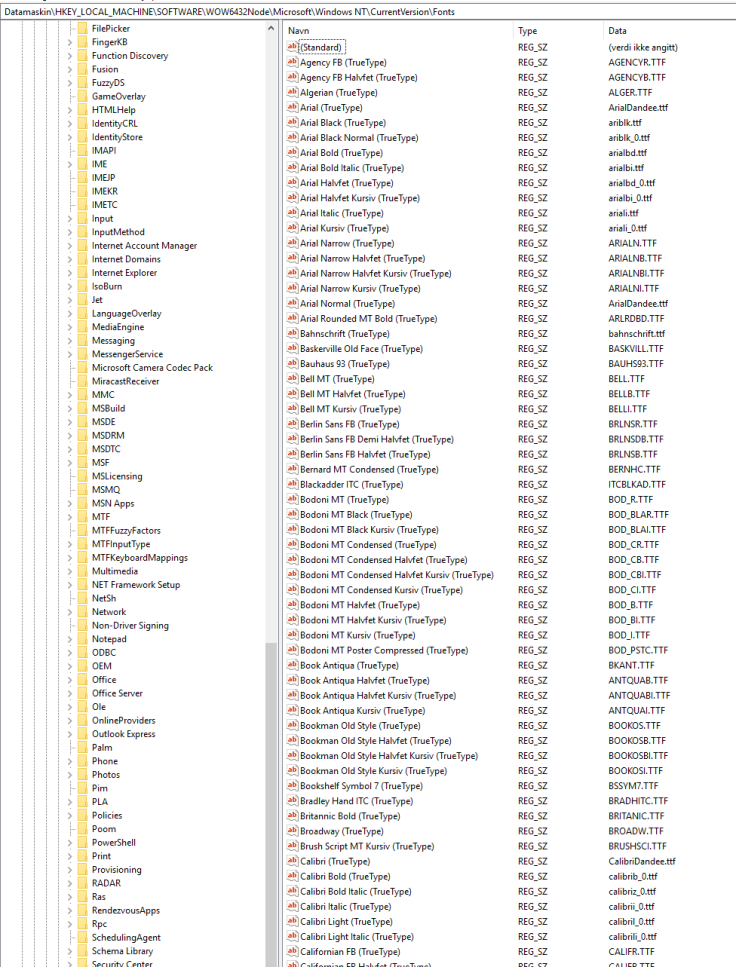
Now, find the font that you’ve edited (e.g. Segoe UI, Tahoma, Calibri, etc.). Depending on the context, you’ll need to either find the unbranded version of it, and/or the Normal-branded version. You generally do NOT want to replace the other versions as well, unless you want to replace that font with another font entirely (e.g. replacing Segoe UI with Arial); or if you’ve made e.g. an extra italics font based on the italics version of the alphabet font, for the sake of writing in Notepad and the likes.
Double-click on the correct version, and replace the existing file connection (e.g. calibri_0.ttf) with the exact filename that you gave the amended font (e.g. CalibriJohnFreeman.ttf). The consequences of misspelling it (or changing the value of the wrong font), could range from “This text looks slightly silly” to “Where did all the text go?”, so this is not something you’d want to mess up. Once you’re certain that you wrote it correctly, press OK, and it autosaves, ready to take effect on the next boot.
Now, restart the PC, open the program that you were struggling with the symbols of, and voilá, the stars, notes, and everything else should now be visible for you once again!
If it didn’t, there’s a very high chance that the program uses a different font than you thought it did. For instance, Takoma, Segoe UI, and Arial looks very, very similar when it comes to individual A-Z letters. In that case, double-check which font the program is using, and/or do some trial-and-error with important Windows system fonts.

Write a reply...